How to Set Up Guest Wi-Fi
Give your guests internet access the safe way.
Nov 19, 2025 | Share
Brand Guides
There’s nothing wrong with sharing your home network with friends and family. You can (usually) trust that they won’t do anything nefarious with your connection.
But you don’t want to distribute your primary network password to everyone that steps into your home or office. That’s where a guest network comes into play.
Pro tip:
Most modern/routers support guest access, but check the specifications on the website or in the manual before continuing with this guide.
How to set up a guest Wi-Fi network
We split this section into two parts to make the process easier for first-timers—logging into your router and setting up the network.
Part 1: Log in to your router using a browser.
If your router or hybrid device doesn’t provide an app, you’ll need to access the settings using any web browser. While you can do this on a smartphone, computers and tablets are best since router interfaces may not be optimized for small screens.

To continue, you need the router’s IP address or login URL. You can probably find it on a sticker attached to the back or bottom of your router. Chances are, it’s 192.168.1.1, 192.168.0.1., or something like “netgearlogin.com.” We’ll also show you how to find your router’s IP address in Windows and macOS.
Pro tip:
This sticker also includes the default username and password, but they’re useless if you previously changed this information.
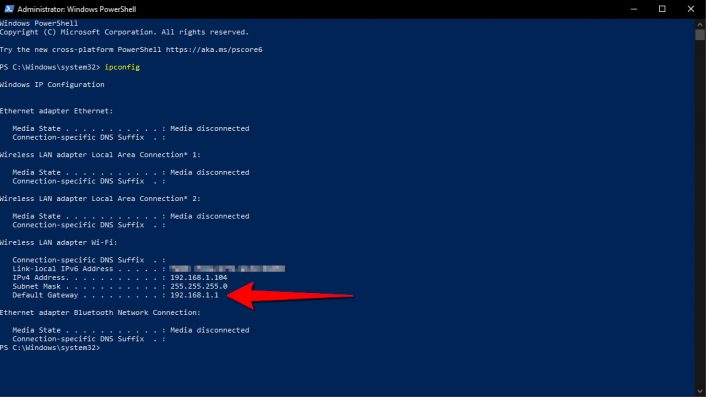
Get your router’s IP address in Windows 10
Step 1: Right-click on the Start button and select Windows PowerShell (Admin) or Windows PowerShell on the Power User Menu.
Step 2: Type “ipconifg” at the prompt.
Step 3: Write down the number displayed next to Default Gateway.
Get your router’s IP address in macOS
Step 1: Open System Preferences by clicking on the icon displayed on the Dock.
Pro tip:
If you don’t see the System Preferences icon, click on the Apple logo in the top left corner and select System Preferences listed on the drop-down menu.
Step 2: Select Network.
Step 3: Select Wi-Fi listed on the left.
Step 4: Click on the Advanced button.
Step 5: Select the TCP/IP tab.
Step 6: Write down the number displayed next to Router.
Pro tip:
To find the router’s IP address using mobile devices, refer to our separate guide.
Access your router’s settings
Step 1: Make sure the device you’re using is connected to the local network.
Step 2: Enter the router’s IP address or URL into any web browser’s address bar.
Step 3: Enter the required credentials once the router’s login screen appears.
For routers and hybrids provided by internet service providers (ISPs), you may need to contact customer support if you can’t locate the login information in the paperwork or on the back of your device. If you changed the username and password, use that instead.
Part 2: Establish your guest network.
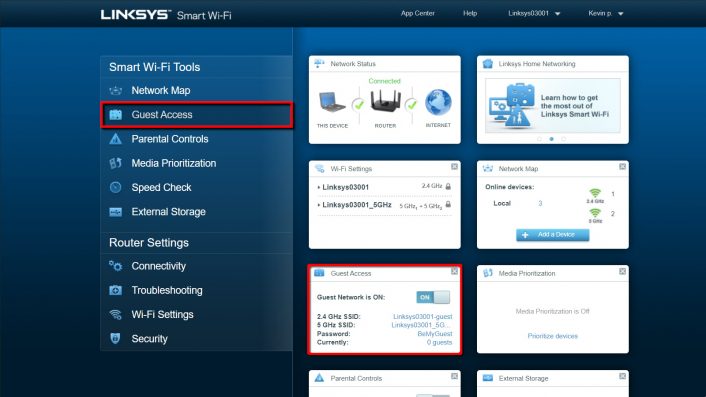
With the router backend loaded, there should be a Guest Access category or tab. For instance, the Linksys Smart Wi-Fi interface lists Guest Access on the left. However, there may also be a Guest Access card displayed on the right, including a toggle, SSIDs, and password information.

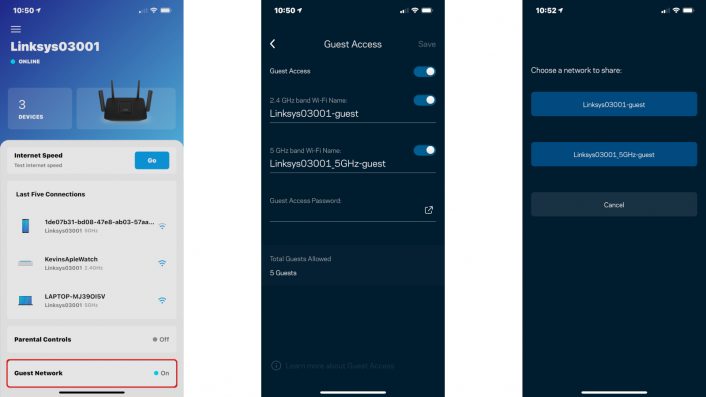
The company’s app saves you the trouble of accessing the browser-based backend by supplying Guest Network settings. The category resides under the Last Five Connections list.

In both cases, enabling guest access is as easy as tapping or clicking the toggle.
The following instructions are based on the Linksys app and web interface, so the steps may differ slightly with your specific router.
Step 1: Tap or click on the toggle to enable guest access.
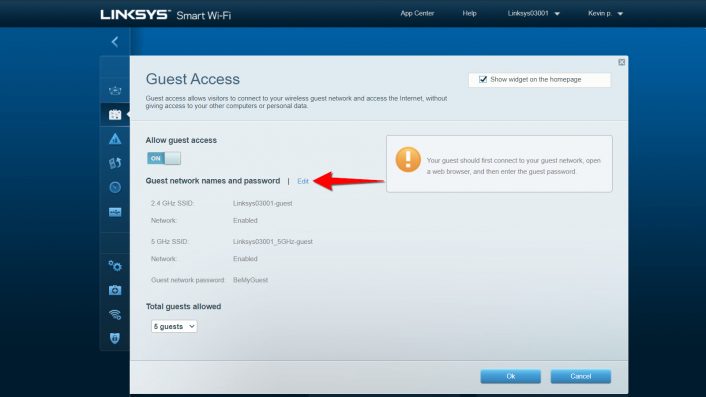
Step 2: In the web interface, click Edit to make changes to the settings. (This step isn’t required in the app.)

Step 3: Change the SSIDs (network names) for the 2.4 GHz and 5 GHz connections. The names can be anything you want—just make sure they’re different than your primary SSIDs. You could always enter something unique just to annoy your neighbors.
Step 4: Tap or check/uncheck connections if needed. The 2.4 GHz band is crowded and slower but has a wide range. The 5 GHz band is less crowded (for now) and faster but has a shorter range. You can provide both to guests or just one—it’s up to you.
Step 5: Set the guest access password. Do not use the same password that grants access to your primary network.
Step 6: Set the total number of guests allowed. In the case of Linksys, the allowance ranges from 5–50 guests.
Step 7: Click the OK button or tap Save to finish.
Some routers allow you to limit the bandwidth used by guests. For example, TP-Link routers have Enable Bandwidth Control and Guest Network Bandwidth Control settings to prevent guests from clogging the digital freeways.
Are you getting the best and fastest internet connection available in your area?
Enter your zip code below to find out.
Getting started with your router (for beginners)
If you jumped to this section because you’re not familiar with networking, we’ll explain here what devices are used to provide internet access. We’ll also briefly explain what’s used to change their settings.
Router vs. modem, simplified
You need both a modem and a router to get online. You could have a separate modem and router or a combo unit, called a gateway. Your modem translates the internet signal from your ISP. Your router distributes the signal to your devices through Wi-Fi or wired connections. Since your router is the device that directly communicates with the devices on your network, it’s used to set up your guest network.
Accessing your device settings: App vs. web interface
How you access the router depends on the model. Standalone units and modem/router hybrids typically require users to log in using a web browser. That means you’ll need to know the IP address or custom URL and enter it into the browser’s address bar.
Some routers and Wi-Fi kits provide an app for accessing basic settings, like creating a guest network and enabling parental controls. Linksys and Eero are two great examples.
In contrast, hybrid units provided by ISPs, like the Hitron EN2251 supplied by Spectrum, may not have app-based access. Mesh kits like Eero and Luma don’t support web browsers—their settings are managed only through apps.
With this information in hand, you can now set up a guest Wi-Fi network.
Guest network alternatives
This method requires some extra work, but if you’re running an Airbnb or something similar, you may want to consider installing a second router for your guests to use rather than a guest network based on your own router.
Routers can handle only so much traffic—think of them as set-top computers with a processor, memory, and storage that manage only network traffic. If the processor is overwhelmed with too much work, websites are slow to load and downloads are reduced to a trickle.
With a second router, you could establish it as a dedicated guest network that will never access your primary network. Moreover, all that traffic will never reach your main router, so both perform at optimum speeds.
Pro tip:
Looking for a new router? Take a look at our list of the best Wi-Fi routers for 2021 to see our recommendations!
How to add a second router
You can add a second router by connecting it in one of several ways:
Modem/router with one Ethernet port
Connect an Ethernet cable from the modem/router device to the WAN (or Internet) Ethernet port on the router.
Modem/router with multiple Ethernet ports
Connect a cable from any Ethernet port on the modem/router device to the WAN (or Internet) Ethernet port on the router.
Separate modem and router
You will need a gigabit Ethernet network switch box to enable multiple Ethernet connections, as modems typically have only one Ethernet port.
First, connect one Ethernet cable from the modem to the first Ethernet port on the switch box. Next, connect another Ethernet cable from each router to the next two Ethernet ports on the switch box.
Technically you could connect the second router to an Ethernet port on the main router and not use a switch box, but if something happens to the first router, it won’t affect the second.
Pro tip:
When using Ethernet cables, we suggest using the flat type so they’re flushed against walls and baseboards.
You can place the second router in another office or whatever you use for Airbnb. Mesh kits are suitable for Airbnb scenarios, especially if you have two or more rooms for rent.
In this scenario, guests are on a completely separate network, but you can still manage it using the web interface or supplied app. The incoming and outgoing data goes straight to the modem rather than through your primary router.
Why should you set up a guest Wi-Fi network?
Security
You don’t want the primary network’s password passed around like a business card, and you certainly don’t want strange devices mingling with your computers, consoles, and IoT gadgets. Guest devices should always be separate in case they’re infected with malware or the visitor has other nefarious reasons than just stopping by to say “hello.”
Control
With a guest network, you can limit the number of guests, and, in some cases, how much bandwidth they consume. Your resident devices may already bog down the home network, and added guests could bring your internet congestion to a crawl like five o’clock traffic. Limiting how much data guests consume can help prevent those annoying traffic jams.
Convenience
Guest Wi-Fi networks can be temporary and provided without a password, granting your guests immediate access to the internet during their stay. When all guests are gone, just toggle it off until the next time you want to offer free access.
Overall, guest Wi-Fi networks are primarily best served in businesses—think Walmart, airports, hospitals, and so on. They’re also great if you’re running an Airbnb and internet access is part of the package. You can also use a guest network for smart home devices, so if hackers infiltrate these devices, they can’t go beyond the guest network.
Author - Kevin Parrish
Kevin Parrish has more than a decade of experience working as a writer, editor, and product tester. He began writing about computer hardware and soon branched out to other devices and services such as networking equipment, phones and tablets, game consoles, and other internet-connected devices. His work has appeared in Tom’s Hardware, Tom's Guide, Maximum PC, Digital Trends, Android Authority, How-To Geek, Lifewire, and others. At HighSpeedInternet.com, he focuses on network equipment testing and review.
Editor - Cara Haynes
Cara Haynes has been editing and writing in the digital space for seven years, and she's edited all things internet for HighSpeedInternet.com for five years. She graduated with a BA in English and a minor in editing from Brigham Young University. When she's not editing, she makes tech accessible through her freelance writing for brands like Pluralsight. She believes no one should feel lost in internet land and that a good internet connection significantly extends your life span.


